
Gmail Saving Emails A Practical Automation Guide
Saving emails in Gmail can be as easy as slapping on a label. For years, "saving" an email just meant hitting 'Archive' and hoping for the best. But that’s the old way. The smart move today is to connect your inbox directly to a workspace like Notion, which turns those static messages into live, actionable data.
Why Your Inbox Isn't a Filing Cabinet

Let's be real—your Gmail inbox is built for one thing: communication. It's not a long-term storage unit. And when you treat it like one, you create hidden productivity traps for yourself.
Ever tried to dig up a specific invoice from six months ago? Or piece together a client conversation from a dozen scattered threads? It's a painful, time-sucking chore.
The fundamental problem is that an inbox is reactive. It's designed to show you what's new, not to help you manage what's important. This is exactly why moving key emails out of Gmail is such a game-changer. It’s not about backing things up; it’s about transforming passive information into an organized, active resource.
From Simple Archiving to Strategic Action
When Google launched Gmail back in 2004 with a massive 1 gigabyte of storage, it totally changed how we handled email. We all stopped deleting things. Now, with 15 gigabytes of free storage spread across Google's services, the instinct is to hoard everything. But that digital clutter costs you clarity and focus.
Pulling important messages out of your inbox and into a structured space like Notion lets you add context and make them genuinely useful.
Think about these real-world scenarios:
- Client Work: An email from a client with project feedback gets saved directly to their project page in Notion. Instantly, it becomes a task you can track.
- Financials: Every digital receipt or invoice you get is automatically sent to a "Finances" database, completely ready for tax season. No more frantic searching.
- Knowledge Base: That amazing newsletter you just read? Save it to a personal "Learning Hub" and tag it by topic so you can actually find it later.
This shift in mindset—from archiving to acting—is how you unlock the real value buried in your inbox. You stop seeing emails as dead-end conversations and start using them as building blocks for your projects and your brain.
This approach also supercharges your organization. Instead of just relying on Gmail’s search bar, you can use Notion's powerful filters and database views. See your saved emails on a calendar, move them along a Kanban board, or group them by client.
It's about creating a dedicated, external system that is resilient, organized, and built for action. If you want more ideas on taming your inbox, check out our guide on https://www.notionsender.com/blog/post/6_simple_email_management_tips_to_boost_your_productivity.
Setting Up Your Digital Workspace for Success
Before you even think about connecting apps, a little prep work will save you a world of headaches later. The real goal isn't just to dump emails into a digital folder—it's to build an intelligent, organized system from the ground up. And that all starts with creating a dedicated home for your emails right inside Notion.
Think of this prep phase as laying the foundation. When the automation finally kicks in, you'll know every message is landing exactly where it should, with all the right context already attached. This is the key to making gmail saving emails a genuinely useful part of your workflow.
Building Your Notion Email Database
First things first: you need a new, dedicated database in Notion specifically for your emails. This is going to be your central command center for everything you save. To really get a handle on your digital communications, especially for work, integrating robust cloud software for small business can make a massive difference in keeping things organized and accessible.
Once you’ve got a blank database, it’s time to give it some structure by adding properties. These properties are like the columns in a spreadsheet, and they’re what will allow you to sort, filter, and actually make sense of your saved messages down the line.
I'd recommend starting with these essential properties:
- Sender (Email): This will grab the email address of whoever sent you the message.
- Subject (Title): This is the main "Title" property and will hold the email's subject line.
- Date (Date): Logs the date the email was received, which is super helpful for sorting chronologically.
- Category (Select/Multi-Select): Lets you tag emails with your own labels like "Client," "Invoice," or "Project Alpha."
- Status (Select): A simple way to track where things are at with labels like "To-Do," "In Progress," and "Done."
The real magic here is turning messy, unstructured email data into clean, structured information. An email is no longer just a wall of text; it becomes a database item with distinct, filterable attributes you can actually work with.
This flow is pretty straightforward—you set up the database, install the tool, and you're almost there.
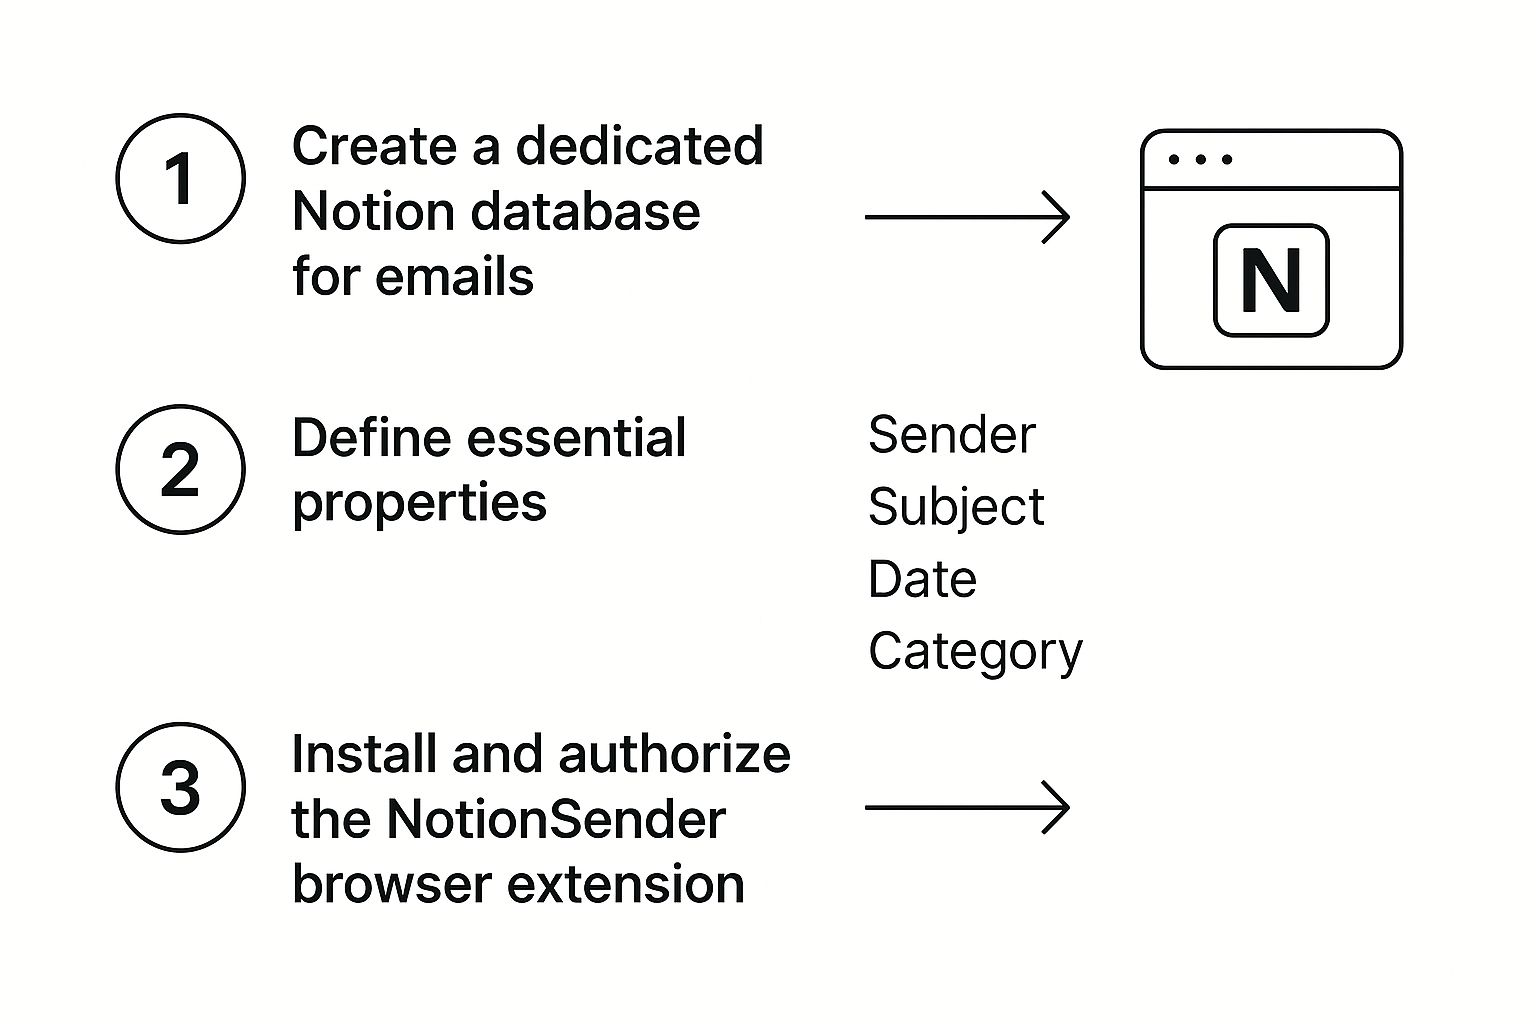
Each step builds on the last, creating a solid system for managing your inbox without the chaos.
Installing and Authorizing NotionSender
With your Notion database ready to go, the next piece of the puzzle is the NotionSender browser extension. This little tool is the bridge that connects your Gmail account to your new database.
Installation is as easy as you'd expect—just find it in your browser's extension store (like the Chrome Web Store) and click "Add." Once it's installed, you'll need to authorize it. This just means giving it permission to talk to both your Gmail and Notion accounts. It will ask for specific permissions, which it needs to read the emails you want to save and then write them into your Notion database.
It’s always a good idea to quickly review what permissions an extension is asking for. A reputable tool like NotionSender will only request access to what it absolutely needs to do its job.
The Secret Sauce: Gmail Labels
Finally, let's talk about the key to making this whole thing work on autopilot: Gmail labels. The NotionSender extension is designed to watch for specific labels that you apply to emails. When it sees one, it jumps into action.
So, before you start saving anything, head into Gmail and create a few key labels that mirror the categories you set up in your Notion database. I like to nest them for clarity.
For example, you could create labels like:
Save/ClientSave/ReceiptSave/Project-Bravo
By setting up your labels this way, you create a dead-simple, predictable workflow for yourself. When an important receipt hits your inbox, just slap the Save/Receipt label on it. That's your trigger. You're telling the system exactly what to do and where to send it. This little bit of organization upfront is what makes the whole system run like a well-oiled machine without you having to think about it.
Alright, with the groundwork laid, it's time for the fun part: making the magic happen. This is where we bridge the gap between your Gmail labels and your Notion database, building a smooth, automated workflow that takes the busywork off your plate. And don't worry, this isn't some complex coding project. We're just setting up a few simple but powerful rules to handle the task of gmail saving emails for you.
The whole idea is to map a specific action in Gmail—like applying a label—to a specific outcome in Notion, which is creating a new, perfectly organized database entry. You're basically teaching the system: "Hey, when I tag an email with 'Project-Alpha,' I want you to file it away in my 'Project-Alpha' database." Simple as that.

This is what a well-organized Gmail inbox can look like. Those colorful labels aren't just for show; they're the triggers for our entire automation.
Connecting Labels to Databases
Think of the NotionSender extension as your command center for this whole operation. Inside its settings, you'll create what are called "workflows" or "rules." Each rule is just a straightforward instruction: "When I apply this specific label in Gmail, send the email over to this specific database in Notion."
You'll set up a unique rule for every connection you need. For instance:
- Rule 1: The
Save/Receiptlabel sends emails to your "Finances" database. - Rule 2: The
Save/Clientlabel sends emails to your "Client Communications" database. - Rule 3: The
Save/Newsletterlabel sends emails to your "Knowledge Hub."
This one-to-one mapping is what gives you such precise control. There's no guesswork. You're building a reliable system that sorts everything for you based on that one simple click of applying a label. If you want to see this in even more detail, feel free to check out our deep-dive guide: https://www.notionsender.com/blog/post/how-to-send-email-to-notion.
The real power here is in the simplicity. You aren't learning a complicated new process. You’re just adding a single, intentional click in Gmail that kicks off a powerful organizational workflow behind the scenes.
And while we're focused on personal email here, it's worth noting how automation streamlines processes across all sorts of business contexts. The same principles apply.
Mapping Email Fields to Notion Properties
So, you've linked a label to a database. The final piece of the puzzle is telling NotionSender exactly how to file the email's contents. This is called field mapping, and it's where you match up the different parts of an email (like the sender or subject line) with the properties you created in your Notion database.
This step is what ensures your data lands in a structured, genuinely useful format. A typical mapping might look something like this:
| Email Element | Notion Property | Why It's Useful |
|---|---|---|
| Sender's Email | Sender |
Lets you easily filter communications from a specific person or company. |
| Subject Line | Subject |
Becomes the title of your Notion page, making it instantly recognizable. |
| Date Received | Date |
Allows you to sort your saved emails chronologically, which is crucial for tracking timelines. |
| Email Body | (Page Content) | The full text of the email is saved right inside the Notion page for complete context. |
| Attachments | (Page Content) | Any files are embedded directly in the Notion page, keeping everything together. |
This mapping process is what turns a basic email into a rich, sortable database entry. You're in the driver's seat, deciding exactly which bits of information are important and where they should live in your Notion workspace.
Seeing Your Automation in Action
Once it's all set up, the workflow is incredibly satisfying. An important invoice hits your inbox. You slap the Save/Receipt label on it. A moment later, a new entry pops up in your "Finances" database in Notion.
The sender's address is neatly filed, the subject line becomes the page title, and the PDF invoice is sitting right there inside the page. Just like that, you’ve built a hands-free system for gmail saving emails, transforming your inbox from a chaotic mess into a dynamic, organized, and truly actionable resource. You're finally in complete control.
Advanced Strategies for Your Email Archive
<iframe width="100%" style="aspect-ratio: 16 / 9;" src="https://www.youtube.com/embed/XVw4w1Odrfs" frameborder="0" allow="autoplay; encrypted-media" allowfullscreen></iframe>
So, you've got your automation running and emails are flowing nicely into Notion. That’s the first big win. But simply having a digital filing cabinet isn't the end goal. The real magic happens when you turn that static archive into a living, breathing productivity hub.
Your Notion database is way more than just a list—it's a canvas. The easiest way to start painting is by playing with Notion's powerful database views. They let you look at the same information from completely different angles, unlocking new workflows you might not have considered.
Forget the default table view for a minute. Imagine transforming your email list into a dynamic project board.
- Kanban Board View: This is a game-changer. Group your database by the "Status" property you created. Suddenly, you can physically drag emails from a "To-Do" column to "In Progress" or "Complete." Client requests just became a visual project management system.
- Calendar View: Switch over to a calendar organized by the "Date" property. It's perfect for tracking project deadlines mentioned in emails or just getting a bird's-eye view of your communication timeline.
- Timeline View: For projects that span weeks or months, the timeline view is your best friend. It maps out the entire history of a client relationship, showing every saved email and attachment in chronological order.
Automating Actions Within Notion
Your workflow shouldn't stop the moment an email lands in your database. The next step is to build automations inside Notion that kick off when a new email arrives. For example, you can set up a rule that automatically assigns any new email tagged with "Client Inquiry" to a specific team member and slaps a "Needs Reply" status on it.
This is where you build a truly resilient system. It ensures nothing slips through the cracks because the email isn't just saved—it's processed, assigned, and slotted right into your active workflow without you lifting a finger.
By combining the external automation of getting emails into Notion with internal automations within Notion, you create a hands-off system that doesn't just store information, but actually starts the work for you.
Managing Large Volumes and Finding Anything Instantly
As your archive grows, you'll need a strategy to manage it. It's wild to think that Gmail users send and receive over 121 billion emails every single day—a number that's only going up as the user base heads toward 2 billion people by 2025. You can read more about these staggering email volume statistics on EmailAnalytics.com.
While your personal archive is just a tiny drop in that ocean, the principles of good data management are the same. Get comfortable with Notion's filtering and sorting tools. You can create saved views that instantly show you only emails from a specific sender, related to a certain project, or received in the last 30 days.
For emails with huge attachments, you might want a dedicated process. Consider manually moving the files to a cloud storage service like Google Drive or Dropbox, then simply pasting the link into the Notion page. This keeps your database nimble and fast, while still giving you one-click access to everything you need.
Email Saving Methods Comparison
Choosing how to save your emails depends on what you need to do with them. A simple label in Gmail is great for quick organization, but a dedicated tool like NotionSender offers a much more powerful, searchable, and integrated solution. Here’s a quick breakdown to help you decide.
| Method | Best For | Ease of Use | Searchability |
|---|---|---|---|
| Gmail Labels & Filters | Simple, quick categorization within Gmail | Very Easy | Good (within Gmail's search) |
| Manual Forwarding | Saving a few critical emails to another app | Easy but Repetitive | Varies by destination app |
| IFTTT / Zapier | Basic, automated saving for non-tech users | Moderate | Depends on Notion setup |
| NotionSender | Creating a powerful, integrated database | Easy (after setup) | Excellent (uses Notion's full power) |
Ultimately, while basic methods have their place, integrating your emails directly into a Notion database unlocks the ability to build true workflows around them, turning a passive archive into an active part of your productivity system.
What Are My Other Options for Saving Emails?
While a direct Gmail-to-Notion setup is a game-changer, it’s not the only way to get your emails organized. The best tool really comes down to what you need it for. Your budget, how much you enjoy tinkering with tech, and your end goal for those saved emails all play a part.
It’s smart to look at the alternatives. You might find that a simple, manual approach works just fine, or you might discover you need the power of a full-blown automation platform. Let's dig into a few.
For the Power Users: High-Flexibility Automation Platforms
If you love building custom workflows and connecting all your apps, then platforms like Zapier and Make (which you might remember as Integromat) are your playground. Think of them as the digital glue that can stick thousands of different apps together, including Gmail.
With these tools, you can create some seriously complex, multi-step automations. For example, you could build a "Zap" that doesn't just save an email attachment to Google Drive, but also pings your team on Slack and adds a task to Asana.
- The upside: You get almost endless customization possibilities. You can connect a whole chain of apps in a single workflow, and the error handling is usually pretty solid.
- The downside: They can be tricky to learn. Plus, the costs can add up fast depending on how many automations you run each month.
These platforms are perfect when your email is just one small step in a much bigger automated process. If you’re willing to put in the time to set them up, the power you get is unmatched.
This level of control often means getting familiar with how different services communicate. For anyone building their own integrations, checking out technical resources like the NotionSender API documentation can give you a behind-the-scenes look at how these connections are made.
For a Simpler Approach: Direct and Manual Methods
On the flip side, sometimes you just need something that works without a lot of fuss. These methods are quicker to set up but don't offer the same automation magic.
The most basic tactic? Just manually saving important emails as PDFs. Drag and drop them into a dedicated folder in Google Drive or Dropbox, and you’ve created a simple, searchable archive. It's a reliable, no-frills way to back up critical documents.
Another route is using a dedicated backup service. These tools do one thing and one thing only: create a secure, complete, and independent archive of your entire inbox. They’re less about integrating into your daily workflow and more about disaster recovery or long-term compliance.
As cloud storage gets bigger and better, our inboxes follow suit. The average inbox is on track to hold over 14 gigabytes by 2030. It’s no wonder that around 15% of users are already using AI tools in Gmail to keep the chaos at bay. This just goes to show how critical it is to have a smart strategy for saving what matters.
Whether you go for a powerful automation engine or a simple backup tool, the goal is always the same: pull important information out of the never-ending stream of your inbox and put it into a system where you’re in control.
As you start to weave this new email-saving system into your workflow, you're bound to have a few questions. Getting into the weeds of gmail saving emails can seem a bit technical at first, but thankfully, the most common hang-ups have pretty simple answers.
I've rounded up the questions I hear most often to help you get your setup dialed in and feel confident using it.
Can I Save Email Attachments to Notion?
Yes, you absolutely can. This is actually one of the biggest perks.
When you set up a tool like NotionSender to handle your emails, you can choose to bring the attachments along for the ride. Any files—PDFs, images, documents, you name it—will show up right on the Notion page created for that email. It's a fantastic way to keep all your related materials neatly bundled in one place.
Is It Safe to Grant Extensions Access to My Accounts?
It's always smart to be cautious with your data, so this is a great question. The key is to stick with well-reviewed extensions from reputable developers who are transparent about their privacy policies.
Before you install anything, always check the permissions it's asking for. A trustworthy tool will only request access to what it genuinely needs to do its job.
For super sensitive or confidential information, you might want to stick with a more manual copy-paste method or look into enterprise-level automation platforms. They often come with advanced security protocols and compliance features built-in.
What if I Delete a Saved Email from Notion?
Worried about accidentally messing up your inbox? Don't be.
If you delete an email page from Notion, nothing happens to the original email in your Gmail account. The action is totally one-way; it doesn't touch your inbox at all. The email stays right where it is, safe and sound in Gmail.
This is a major advantage of this method. It protects your primary email records from any accidental deletions while you’re tidying up your workspace in Notion.
Ready to stop searching and start organizing? NotionSender makes it effortless to turn your chaotic inbox into a structured Notion database. Get started for free today and see the difference!

