
How to Automatically Send an Email from Notion
You can automatically send an email by using specialized tools like NotionSender that plug right into your project management software. These tools can trigger messages based on specific actions you take.
For example, just changing a project's status in a Notion database from "In Progress" to "Complete" can instantly fire off a confirmation email. This simple switch saves you from all that manual follow-up and turns your existing workflows into a powerful communication engine.
Why Automate Emails Directly From Notion?
Imagine your project management hub—Notion—doubling as your personal email assistant. That’s the real beauty of automating emails directly from your workspace. Instead of constantly flipping between your task list and your inbox, you build one seamless system where data updates trigger the right communication, every time.
This approach is more than just a time-saver; it’s about making your communication more reliable and context-aware. Automated email workflows are a cornerstone of modern business strategy for a reason. In fact, a whopping 63% of marketers worldwide now use marketing automation for their email campaigns, making it the most common use for these kinds of tools.
Practical Scenarios for Notion Email Automation
Once you connect a tool like NotionSender, you can start building some seriously powerful, trigger-based systems. Here are a few real-world examples I've seen work wonders:
- Client Onboarding: You add a new client to your Notion CRM database. The moment you do, it automatically sends them a personalized welcome email with all the next steps. No delay, no forgetting.
- Project Updates: You change a project's status property to "Needs Review." Instantly, the right stakeholder gets an email with a link to the task, ready for their feedback.
- Invoice Reminders: That "Payment Status" field gets updated to "Overdue." Boom—a polite follow-up email is triggered and sent to the client's billing contact.
Each of these scenarios completely removes a manual step. This not only cuts down on the chance of human error but also ensures timely communication without you having to lift a finger.
By integrating your central workspace with your email outreach, you create a single source of truth. Your Notion database doesn't just store information anymore—it actively communicates it.
If you want to zoom out and see how this fits into a larger picture, it's worth exploring how to build a comprehensive email marketing automation strategy. Ultimately, this kind of integration empowers small businesses and project managers who live in Notion to work smarter, not harder.
Connecting NotionSender to Your Accounts
Before you can start firing off emails directly from Notion, you first need to get your accounts talking to each other. This is the foundational step: creating your NotionSender account and then giving it the green light to connect with your Notion workspace and your email provider, whether that's Gmail, Outlook, or something else. Think of it as introducing three friends and letting them know it's okay to share information.
First things first, you'll need to sign up. The account creation process is designed to be quick and painless, getting you from zero to ready in just a few minutes. If you want to follow along, you can go ahead and create your NotionSender account right now. This is your entry point to all the automation goodness.
Once you're in, the next piece of the puzzle is authorizing permissions. This part is critical, but it's also straightforward. NotionSender will ask for permission to see specific pages in your Notion workspace—not your entire account. This is a key detail, as it means you’re always in control. At the same time, you’ll connect your email account, which lets the tool send emails for you, without ever needing access to your inbox.
Granting Secure Access
You don't have to worry about security here. The whole process uses the official, secure authorization methods provided by Notion and your email service, so your data stays locked down.
Here’s what you’ll be granting permission for:
- Notion Access: You'll be prompted to pick and choose the exact Notion pages or databases you want NotionSender to connect with. This granular control is great because it means the tool only ever sees what you explicitly allow it to.
- Email Provider Access: You’ll simply log into your email provider (like Gmail) through a secure pop-up and approve NotionSender’s request to send messages. It’s purely for sending, not reading.
This screenshot shows you what that initial connection screen looks like, where you'll start linking everything together.

Once everything is connected, you'll get a confirmation, and your setup is officially live.
With your accounts linked up, you've built the bridge that makes the automation possible. Your Notion database is now primed to send out data, and your email account is standing by to deliver messages based on your triggers. Now for the fun part: telling NotionSender how to read your database.
Alright, let's get your Notion database and NotionSender talking to each other. Now that your accounts are connected, the real magic begins: telling NotionSender what information to pull from Notion and where to put it in your emails. This is called mapping.
Think of your Notion database as the brain of the operation, holding all the contact info and personalized details for your outreach. Mapping is simply drawing a line from a column in your database (a Notion property) to a specific field in your email, like the "To" address, the subject line, or even a personalized greeting in the body.
<iframe width="100%" style="aspect-ratio: 16 / 9;" src="https://www.youtube.com/embed/c7C1pSmMRTY" frameborder="0" allow="autoplay; encrypted-media" allowfullscreen></iframe>
Getting this right ensures that the correct information—like a customer's first name or a project update—lands exactly where it's supposed to for every single person on your list.
Core Field Mapping Essentials
To get started, you only need to map a few key fields. This is the foundation for any email automation you'll build and the first step to automatically sending emails straight from your workspace.
For any email campaign, you absolutely have to map these properties:
- Recipient Email: This one is a no-brainer. You'll link this to your 'Email' property in Notion. It’s the most critical connection, telling NotionSender who to send the email to.
- Recipient Name: Connect this to a 'Text' or 'Title' property in your database. This simple step lets you ditch generic greetings and instead use a warm, personal touch like, "Hi {{First Name}}."
- Email Subject: You can map this to a basic 'Text' property for a straightforward subject line, or you can get a bit more clever and use a Notion 'Formula' property to create dynamic subjects for each recipient.
That's it. Just mapping these three fields is enough to turn your database into a powerful communication machine. You can now send personalized emails to hundreds of contacts with a single action.
Your Notion database effectively becomes the single source of truth. By mapping these fields, any update you make in Notion—like changing a contact's name or project status—is automatically reflected in your next email. This keeps everything consistent and accurate without any extra work.
Advanced Mapping for Dynamic Content
Ready to go beyond "Hi {{First Name}}"? This is where NotionSender really starts to shine. By mapping more advanced Notion properties, you can create incredibly dynamic emails that feel handcrafted, not automated.
For example, you could use a 'Formula' property in Notion to combine a client's name and their specific project title to generate a unique subject line like, "An update on the Phoenix Project for Jane." Little touches like this can make a huge difference in your open rates.
To see all the possibilities and get a better technical understanding of how different property types work, it's worth checking out the NotionSender API documentation. It’s a fantastic resource for diving deeper.
Here's a quick look at how you might map a client outreach database to create more dynamic emails.
Notion Property to Email Field Mapping Examples
This table shows some common Notion properties and how you can map them in NotionSender to pull specific data into your emails.
| Notion Property Type | Example Property Name | Mapped Email Field | Purpose in Email |
|---|---|---|---|
| Client Email | To | Defines the primary recipient. | |
| Text | First Name | Body (Placeholder) | Allows for a personalized greeting like {{First Name}}. |
| Formula | Dynamic Subject | Subject | Creates a unique subject line for each recipient. |
| Select | Project Status | Body (Placeholder) | Inserts the current project status directly into the email. |
With a setup like this, your Notion database is no longer just a static list; it's a command center for sending targeted, relevant, and automated emails that get results.
Designing Your Automated Email Template
Now that your data is all mapped out, it’s time to get to the fun part: crafting the actual email. A great automated email shouldn't feel automated. It needs to feel personal and genuinely useful. This is where NotionSender's template editor really shines, helping you turn raw data into a message that connects.
The secret to making this happen is using placeholders. These are little snippets like {{Client Name}} or {{Project Title}} that act as direct pipelines to your Notion database. When an email goes out, NotionSender grabs the right info, so {{Client Name}} instantly becomes "Sarah Jones." It's this simple trick that makes every single message feel unique.
Crafting a Message That Connects
Your main goal here is to write something that people actually want to open and act on. I’ve found the best approach is to keep the tone conversational and crystal clear. Ditch the jargon and get straight to the point.
Every automated email you create should have one—and only one—clear call-to-action (CTA). What’s the very next thing you want the reader to do? Make it impossible to miss.
Need a little inspiration? Here are a few template ideas I use all the time:
- New Client Welcome: "Welcome aboard,
{{Client Name}}! Here are the next steps for the{{Project Name}}project..." - Project Milestone Update: "Hi team, just a quick update: the
{{Task Name}}for{{Project Name}}is now complete. You can check out the final deliverable right here." - Community Onboarding: "So glad to have you in the community,
{{Member Name}}! To help you get settled, here are a few resources to get you started."
See how those placeholders immediately transform a generic template into a targeted, personal message? This kind of personalization isn't just a nice-to-have; it's critical. In fact, segmented email campaigns generate 30% more opens and 50% more click-throughs compared to generic blasts. The proof is in the numbers—tailoring your message really pays off.
Remember, a well-designed template is your silent salesperson and project manager, working 24/7. It builds relationships, provides clarity, and drives action without you ever having to hit 'send'.
Best Practices for Your Email Template
To really make your emails pop, it's worth focusing on a few key details. The subject line is your first (and sometimes only) impression, so make it count. Just adding a placeholder like {{Client Name}} can make a huge difference in engagement. For a deeper dive, we put together a guide on how to increase your open rates with these 10 email marketing tricks.
And don't forget the closing! As you design your templates, a strong finish can make a lasting impression and keep your brand consistent. It's worth exploring some professional email signature examples to see how a polished signature adds that final touch of credibility to every automated message.
Setting Triggers for Your Email Automations
So, you've mapped your data and designed some beautiful templates. The final piece of the puzzle is telling NotionSender when to actually send the email. This is your trigger—the specific action that kicks off the whole automation.
Getting this right is what turns your Notion workspace from a static library of information into a proactive communication machine.
There are really two main ways to fire off an email: you can schedule it for a specific time, or you can have it react dynamically to changes in your database. Scheduled broadcasts are a no-brainer for predictable things, like a weekly newsletter that goes out every Friday at 9 AM or a monthly project update on the first of the month.
Using Database Changes as Triggers
The real magic, though, happens when you use your Notion data itself as the trigger. This approach weaves your email automations directly into your day-to-day workflow, creating a system that responds in real time. Instead of watching the clock, it's watching for actions you’re already taking.
Let's say you have a database for client projects. You can tell NotionSender to keep an eye on a ‘Status’ property. The second you switch a project's status from ‘In Progress’ to ‘Complete,’ NotionSender can fire off a personalized project wrap-up email to the client. No manual effort required.
This infographic breaks down the basic flow of getting your email content ready before you even think about setting up these triggers.
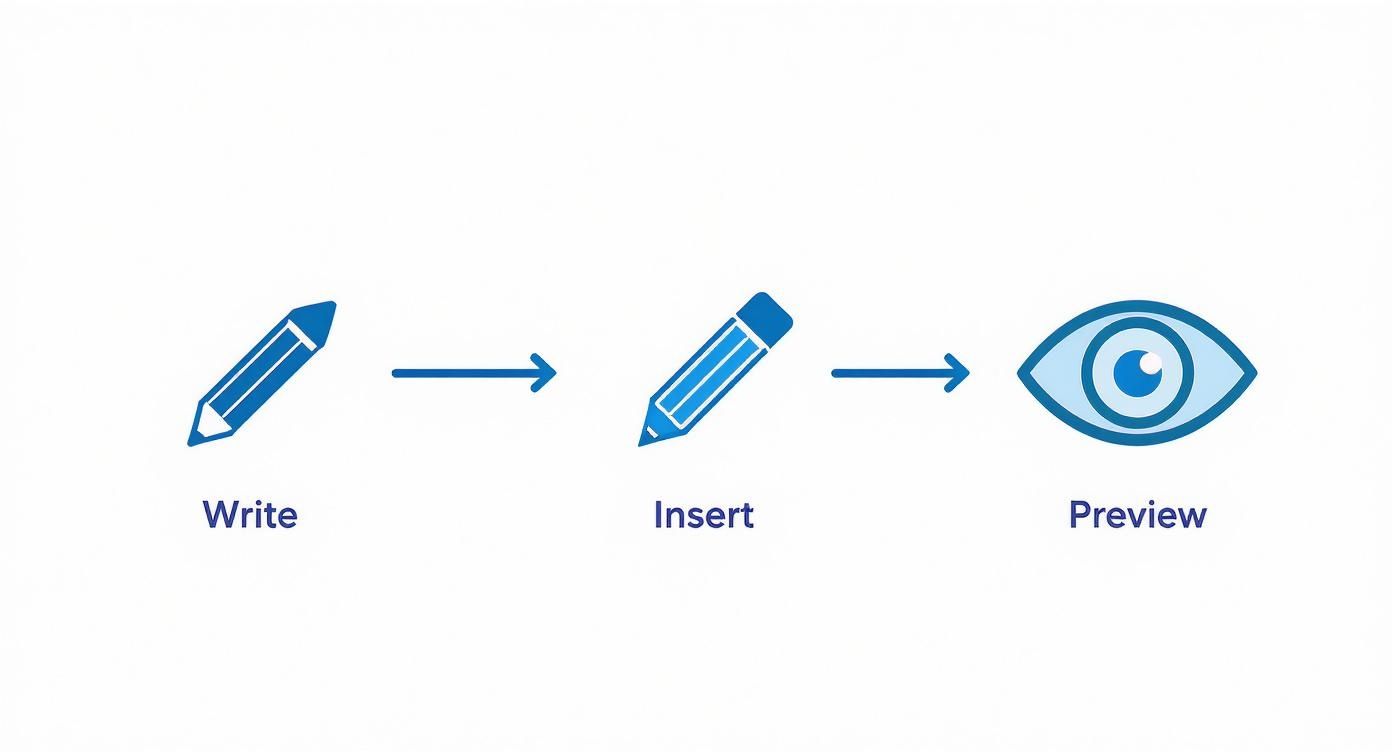
It’s a good reminder that a solid template with dynamic placeholders is the foundation you need before your triggers can do their work effectively.
Real-World Trigger Scenarios
Honestly, the possibilities for data-driven triggers are pretty much endless. This kind of efficiency is a huge reason why the marketing automation industry is exploding—it's projected to become a $6.62 billion market. Companies need scalable ways to communicate, and trigger-based emails are a massive part of that. You can dig into more of these marketing automation trends if you're curious.
To get your wheels turning, here are a few practical trigger ideas you could set up right now:
- Nurturing Leads: A new lead gets added to your CRM in Notion, and their 'Lead Score' property crosses a certain threshold. Boom—a follow-up email is sent automatically.
- Streamlining Onboarding: In a new hire’s onboarding checklist, you check the box for "Send Welcome Kit." NotionSender instantly emails them all the documents they need.
- Gathering Feedback: A 'Project End Date' in your database was two weeks ago. That's the trigger to send an automated email asking the client for a testimonial.
By tying your automations to database updates, you're not just saving time. You're building a smarter, more responsive system where your data does the work for you, ensuring communications are always timely and relevant.
Got Questions About Sending Emails from Notion?
As you start weaving email automation into your Notion workflow, a few questions always seem to pop up. Let's tackle them head-on so you can build your automations with confidence from day one.
Can I Send Attachments from Notion?
Yes, and it's surprisingly straightforward. All you need is a ‘Files & Media’ property in your Notion database.
Just drop the files you want to send into that column for each recipient. When you set up your campaign in NotionSender, you'll map that ‘Files & Media’ property directly to the attachment field. It’s perfect for things like automatically sending out personalized invoices or project-specific reports.
What Happens if an Email Address Is Wrong?
It happens to the best of us, but a single typo won't tank your entire email send. NotionSender keeps a detailed log for every broadcast.
If an email bounces because the address is bad, it gets flagged in your campaign report. You can quickly spot the problem, hop back into your Notion database to fix the address, and resend it just to that one person. No need to bother the rest of your list.
This feedback loop is a game-changer. It helps you keep your Notion contact list clean and your deliverability high over time. Your database literally gets more accurate with every campaign.
Are There Limits on How Many Emails I Can Send?
There are, and they usually come from two places: your email provider (like Gmail or Outlook) and your specific NotionSender subscription plan.
Services like Gmail have their own daily sending caps to combat spam, which is a good thing for everyone. It’s always a smart move to know the limits for both your email service and your NotionSender plan. This will keep your automations running without a hitch, especially as your contact list grows.
Ready to turn your Notion workspace into an automation powerhouse? NotionSender makes it simple to automatically send an email based on your project data. Get started for free today and see how it works!

