Build the Ultimate Notion Client Portal
A Notion client portal is more than just a shared workspace; it's a centralized, interactive hub you build right inside Notion to manage every single aspect of a client relationship. Think of it as replacing all those scattered emails, disconnected cloud drives, and random chat threads with a single source of truth for projects, tasks, documents, and communication.
The result? A professional and branded client experience from day one.
Why a Notion Portal Transforms Your Client Workflow
Let's be honest, the old way of working is a mess. Juggling email threads, shared folders, and constant status meetings isn't just inefficient—it's a surefire way to frustrate both your team and your clients. A well-designed Notion client portal cuts through that chaos. It becomes a command center for everyone involved, bringing a new level of clarity and professionalism to your projects.
No more frantic searches for that one file or trying to piece together feedback from five different places.
This approach does more than just get you organized. It lets you craft a high-touch, bespoke experience that immediately makes you stand out. When a client logs in, they step into a space that feels custom-built for them, which goes a long way in reinforcing your brand's commitment to quality and detail.
A Central Hub for Everything
Instead of hopping between a dozen different apps, a Notion portal consolidates all the essential pieces into a single, cohesive view. This gives both you and your client a bird's-eye view of the entire relationship.
- Project Tracking: Clients can see project timelines, key milestones, and the real-time status of deliverables. This simple transparency dramatically cuts down on all those "just checking in" emails and calls.
- Document Management: Every contract, creative brief, and final asset lives in one logical, secure place, accessible 24/7.
- Task Management: You can assign granular tasks, track their progress, and discuss them right where the work is happening. Everyone knows who’s doing what and when it’s due.
- Clear Communication: All project conversations are kept in context, tied directly to the relevant tasks or documents they refer to.
One of the biggest wins here is how it helps you centralize communication. This makes it so much easier to enhance your client feedback process and keep approvals neatly organized instead of lost in an inbox.
Boosting Efficiency and Client Satisfaction
Modern clients don't just prefer digital convenience—they expect it. In fact, research shows that 88% of customers now expect businesses to have an online self-service portal. It's no longer a nice-to-have; it's the standard.
Implementing a Notion client portal can slash document search time by a staggering 35%. That's a huge efficiency gain that frees you up to focus on the actual work. For many businesses, these systems can save over 100 hours a year while making clients feel more valued and in the loop. You can find more insights on the impact of client portals from ProductiveTemply.com.
When you give clients direct access to project progress and resources, you empower them. This transparency builds a ton of trust and cuts down on friction, leading to a much smoother collaboration and, ultimately, a stronger long-term partnership. You're giving them control and clarity, and they will absolutely value that.
Building Your Portal's Foundation with Databases
A truly great Notion client portal is so much more than a collection of static pages. It's a living, breathing system that runs on interconnected databases. This is where you graduate from simply sharing documents to building an intelligent framework that organizes and presents information all on its own. The goal here is to create a relational structure where data just flows, saving you from endless hours of manual updates.
It all starts with a single, central database: your Clients Master List. Don't think of it as just a contact list; it's the anchor for your entire portal. Every single project, task, and invoice will eventually link back to a client in this foundational database.
The Five Core Databases for Your Portal
To build a system that can actually handle the complexity of client work, you need more than just one list. You'll create a handful of dedicated databases, each with a very specific job. It's like setting up specialized departments in your business that all communicate perfectly with each other.
Here are the essential databases you'll need to create:
- Clients: The top-level database. Each entry is a client company or individual. Think contact info, status (like Active, Onboarding, or Archived), and maybe a unique client ID.
- Projects: This database is for tracking individual engagements. Every project gets linked directly to a client from your master list using a Relation property. It'll hold details like Project Timeline, Status (e.g., In Progress, Awaiting Feedback), and key deliverables.
- Tasks: This is where you get granular with the day-to-day action items. Each task will relate to a specific project, which, of course, is already related to a client. This creates a crystal-clear hierarchy of work.
- Invoices: Keeps all your financial records straight. Every invoice is linked to a client and can also be tied to a specific project. Properties should include Amount, Due Date, and Status (Sent, Paid, Overdue).
- Documents & Resources: This is your central library for every file. It holds contracts, creative briefs, brand assets, and final deliverables, with each item neatly related to the right client and project.
When you put these pieces together, you build a system that delivers a superior client experience—moving from a messy collection of files to an organized, impressive hub.
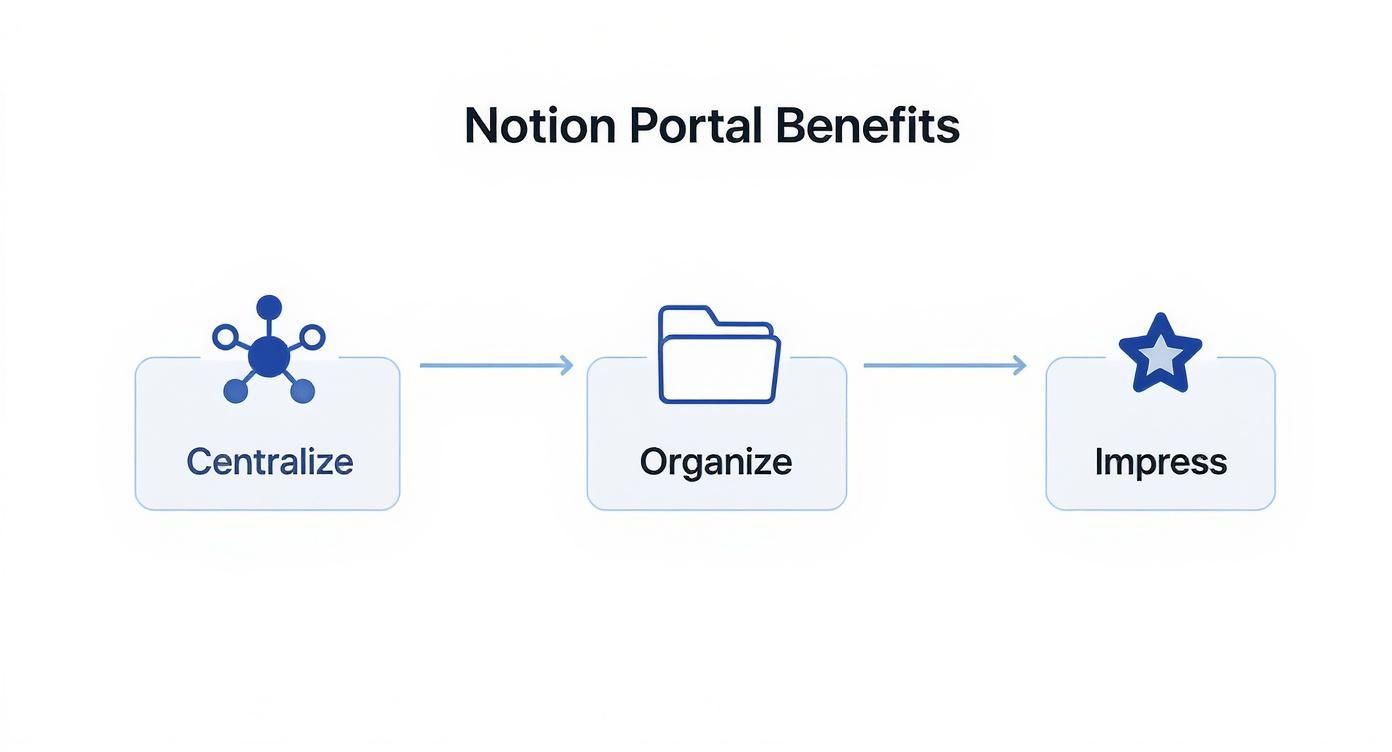
This flow really shows the journey from just centralizing your data to delivering a final, polished output that truly wows each client.
Linking Everything Together with Relations
The real magic that makes this whole system click is Notion's Relation property. It's a feature that lets you link an entry in one database to an entry in another. It's how you tell Notion that "Project Alpha" belongs to "Client ABC," and that "Task 123" is part of "Project Alpha."
For example, when you set up your Projects database, you'll add a new property, call it "Client," and set its type to "Relation." Notion will then prompt you to select the database you want to connect to—you'll just pick your Clients database. From that point on, every new project you create will have a dropdown menu letting you select the right client. Simple.
This relational linking is non-negotiable for a secure and personalized Notion client portal. It's the engine that lets you create filtered views later on, making absolutely sure clients only see the projects, tasks, and documents that belong to them.
This interconnected data structure becomes incredibly powerful when you start adding automations. Let's say you want to send an email notification about a project update. Your system needs to know which client contact is tied to that project. For anyone looking to build more advanced workflows, understanding how this data can be accessed is key; you can dig into the technical side of things in the NotionSender API documentation.
Defining Essential Properties
Once your databases are created and linked, the final step is to flesh them out with properties. These are the columns in your database that hold all the specific pieces of information. Being consistent here is absolutely crucial for filtering and sorting your data down the road.
This table breaks down the essential databases and the key properties you'll need to get started. Think of it as your blueprint for a powerful and organized client portal.
| Database Name | Primary Function | Key Properties Example |
|---|---|---|
| Clients | Central client record | Name (Title), Email (Email), Status (Select), Projects (Relation) |
| Projects | Manage project scope and timeline | Project Name (Title), Client (Relation), Due Date (Date), Status (Select) |
| Tasks | Track individual action items | Task Name (Title), Project (Relation), Assignee (Person), Due (Date) |
| Invoices | Handle financial tracking | Invoice # (Title), Client (Relation), Amount (Number), Status (Select) |
| Documents | Organize all shared files | Document Name (Title), Project (Relation), File Type (Select), File (File) |
By setting up this foundational architecture correctly from the start, you're creating a system that can scale and run efficiently. Your Notion client portal will stop being a simple information dump and become an intelligent workspace that adapts to each client's needs automatically.
Okay, you've got your databases dialed in. Now for the fun part: building the actual client-facing experience. This is where all that backend organization turns into a polished, professional dashboard that will honestly save you countless hours down the road.
The secret? Notion's template feature. We’re going to build one master "New Client Dashboard" template that becomes your one-click weapon for onboarding.
When a new client signs on, you’ll just duplicate this template, and poof—a complete, pre-configured portal appears, already filtered to show only their projects, tasks, and files. No more reinventing the wheel or manually setting up pages for every single new engagement.
This is what separates a cobbled-together setup from a truly scalable, professional service. Every single client gets the same high-quality, branded experience from day one.
Crafting the Master Client Dashboard Template
First things first, create a new blank page in Notion. Call it something obvious, like "[Template] New Client Dashboard". This is your blueprint.
Now, here's the most important part: we are going to use Linked Views of your databases, not the original databases themselves. This is the magic trick for keeping every client's data separate and private.
A linked view is just a live, filtered instance of your main database. Think of it as a window into your master data, but you control exactly what that window shows.
On your template page, you’ll drop in a few of these:
- Projects View: Insert a linked view of your "Projects" database. Create a filter where "Client is..." but leave the actual client field empty. It’s a placeholder we'll fill in later.
- Tasks View: Do the same thing for your "Tasks" database. Add another filter for "Where Project is..." which will let it dynamically pull in tasks from the projects shown just above it.
- Invoices View: You guessed it. Add a linked view of your "Invoices" database and filter it by that same empty client relation.
By setting up your template as a dynamic shell, you've done 90% of the work. When you spin up a new dashboard for a client, you just have to set that one filter, and the entire page instantly populates with their specific information.
Don't Forget a Project Kickoff Template
Beyond the main dashboard, your next most valuable asset is a "Project Kickoff" template. This one is different—it’s a template inside your Projects database. Its job is to standardize how every single engagement starts, making sure you get all the critical info you need right from the get-go.
A consistent kickoff process is one of the easiest ways to prevent scope creep and miscommunication down the line. It sets clear expectations and provides a single source of truth for project goals and deliverables before any work begins.
Your Project Kickoff template page could be simple but powerful. Include things like:
- Project Goals: A section with clear headings for the client to fill out their primary objectives.
- Key Stakeholders: A simple table to list all the decision-makers and their contact info.
- Required Assets Checklist: A checklist of everything you need from them—brand guidelines, logins, content, you name it.
Now, whenever you start a new project, you just select this template. It instantly generates a pre-formatted page that walks the client through giving you everything you need. It makes you look organized and makes their job easy.
Plus, with Notion having crossed the 100 million user mark, there's a good chance your clients are already comfortable with the interface. This familiarity is a huge advantage and likely why over 50% of Fortune 500 companies are using Notion themselves. You can dig into more of Notion's impressive growth with these statistics on SQ Magazine.
Using Template Buttons for Ultimate Efficiency
Want to tie this all together and put it on autopilot? Use a Template Button.
This little block is a game-changer. It lets you pre-program a series of actions that all happen with a single click. On your internal team dashboard, you could create a button called "Onboard New Client."
When you click it, the button can be set up to:
- Create a new entry in your "Clients" database.
- Simultaneously generate a brand new page from your "New Client Dashboard" template.
- Even add a starter "Welcome" task to their new dashboard automatically.
This one final touch turns a tedious, multi-step process into a single click. It transforms your Notion client portal from just a useful tool into a true efficiency engine for your entire business.
Mastering Permissions and Client Onboarding
<iframe width="100%" style="aspect-ratio: 16 / 9;" src="https://www.youtube.com/embed/s9K_V0B4jao" frameborder="0" allow="autoplay; encrypted-media" allowfullscreen></iframe>
Alright, you've built the bones of your portal—the databases are set up and your templates are ready. Now for the most critical piece of the puzzle: managing who sees what. A client portal is only as good as its security. The whole system relies on getting your permissions right so that each client gets their own private, sandboxed space, totally walled off from your other clients and your own backend workspace.
It sounds more complicated than it is. The strategy is simple: you only ever share one single top-level page with each client—their personal dashboard. You never, ever share your master databases or your main Notion workspace. By inviting them to just their dashboard page, you control their entire universe. Everything they see is a filtered database view you’ve specifically curated for them.
Setting the Right Access Levels
When you click that "Share" button on a client's dashboard, Notion presents a few options. Picking the right one is a balancing act between collaboration and security.
- Full access: Honestly, you should almost never give this to a client. It lets them change the page's structure and sharing settings, which is a disaster waiting to happen.
- Can edit: This is your go-to setting for most portals. It allows clients to do what they need to do—check off tasks, drop in comments, and update properties on the items you've shared. It’s the sweet spot.
- Can comment: This is a more locked-down option. It’s useful if you just want clients to provide feedback, like leaving notes on a project brief, without actually changing any data.
- Can view: Think of this as read-only mode. It's perfect for sharing things like final deliverables or project archives where you don't want any more changes.
For the vast majority of client portals, Can edit is the way to go. It empowers them to be active participants without handing over the keys to the castle. They can change a task's status, but they can't accidentally delete your entire Tasks database.
The Client Onboarding Workflow
A slick onboarding experience makes a killer first impression and gets clients using the portal right away. A clunky, confusing start creates friction that can sour the whole project. My process is designed to be clear, professional, and efficient.
The moment a client signs the contract, I head over to my "[Template] New Client Dashboard" page. I duplicate it, rename it for the new client, and then tweak the single filter on each database view to link it to their entry in my master Clients database. In an instant, the entire dashboard populates with their specific information.
Next up is the welcome email. This isn't just a generic invite; it's their quick-start guide. A clear, concise email sets the right expectations and flattens the learning curve. For a deep dive into connecting your email workflow, check out our guide on how to send email to Notion.
Pro Tip: Your welcome email needs three things: a direct link to their new portal, a one-sentence explanation of what it is ("This is our shared hub for all project files, tasks, and updates"), and dead-simple instructions on how to create a free Notion account to get in.
This manual approach works great when you're starting out. But as you grow, you'll want to make it even smoother. To really level up this part of your business, look into how client onboarding automation can handle these repetitive steps for you, creating a seamless handoff from the moment a contract is signed.
Nailing both permissions and onboarding is how you build a Notion client portal that’s not just powerful, but also professional, secure, and genuinely easy for your clients to use.
You’ve got a solid foundation with your databases and templates. That’s the hard part done. But the real game-changer is when you stop doing the manual busywork and let your portal run itself.
This is where we hook your portal into the rest of your world. We’re going to turn it from a static library of information into an active, automated assistant that works for you 24/7.
The biggest win? Bringing email directly into your Notion workspace. Let's be honest, manually copying client emails, sending updates, and chasing replies is a soul-crushing time suck. By plugging in a tool like NotionSender, you can build a two-way communication channel right inside the databases you've already created.

This setup is the goal—a smooth, automated loop between your client conversations and your project command center in Notion.
Bridge Your Inbox and Your Portal
First up, let's get emails going out. Imagine a project’s status flips to "Awaiting Feedback" in your Projects database. Instead of you tabbing over to Gmail to type out a notification, an automation fires it off for you. Instantly.
You can set up triggered emails based on simple property changes in your databases.
- Invoice Reminders: Flip an invoice status to "Sent," and the client automatically gets an email with the PDF. Change it to "Overdue," and a polite (but firm) follow-up goes out without you lifting a finger.
- Project Updates: A quick change to the "Project Status" property can shoot off a tailored email to the client, keeping them in the loop without adding another thing to your to-do list.
This kind of system makes you look incredibly organized and on top of every single detail. For a deep dive on how to set this up, check out this guide on sending emails directly from a Notion database.
Automatically Capture Client Replies
Pushing emails out from Notion is one thing. Pulling the replies back in is where your system becomes truly hands-off. The dream is to practically eliminate manual inbox processing.
When a client replies to that automated project update, you don't want their feedback buried in an email thread. You want it logged directly in Notion, linked to the right project, and maybe even assigned to the right team member.
It’s completely possible with inbound email rules. You can configure a system that automatically parses client replies and turns them into new database items.
Think about it: a client’s email response can automatically create a new task in your "Tasks" database, already linked to the correct project and client. The communication loop is officially closed, and no feedback ever gets lost in the shuffle again.
This kind of powerful integration is possible because the ecosystem around Notion is exploding. With a $10 billion valuation and serious backing, the platform is constantly rolling out new capabilities, especially around AI and enterprise features. That investment ensures tools and integrations will only get more powerful, supporting a massive user base that is 80% outside the US.
Expand Your Automation with Zapier or Make
Email is a huge piece of the puzzle, but why stop there? You can automate almost any repetitive task by connecting your Notion portal to other apps using workflow tools like Zapier or Make. These platforms are the glue that holds your entire software stack together.
Just think through your entire client workflow. What are the little, annoying tasks you do over and over? I guarantee most of them can be automated.
Here are a few ideas I’ve seen work wonders:
- Automated Folder Creation: When you add a new client to your "Clients" database, an automation can instantly create their dedicated folder structure in Google Drive or Dropbox. No more manual setup.
- Meeting Notes Sync: A new client event pops up on your Google Calendar. Boom—a new page is automatically created in your "Meetings" database in Notion, ready for notes.
- Onboarding Task Generation: As soon as a client signs their contract in DocuSign or PandaDoc, an automation can kick off their entire onboarding—creating their client dashboard page in Notion and assigning the first batch of tasks.
Putting your portal on autopilot isn’t just about saving a few minutes. You're building a scalable, reliable system that cuts down on human error, gives clients a better experience, and frees you up to focus on the work that actually moves the needle.
Your Biggest Questions About Notion Client Portals, Answered
As you start piecing together your own Notion client portal, you're bound to run into a few questions. This is totally normal. Getting the setup right is what separates a portal that's a genuine asset from one that just creates more work.
I've built and consulted on dozens of these, and the same handful of concerns pop up almost every time. Let's tackle them head-on so you can build with confidence.
Is Notion Actually Secure Enough for Client Data?
This is always the first question, and for good reason. The short answer? For the vast majority of freelancers, consultants, and agencies, yes, Notion is perfectly secure.
Notion uses industry-standard encryption, but the real power is in your hands. You have incredibly granular control over who sees what. By only inviting specific client email addresses to their designated pages, you create a secure, isolated environment.
Of course, context is key. If you're handling highly sensitive data that falls under strict compliance rules like HIPAA or SOC 2, you'll need to consult a compliance expert. But for managing projects, sharing standard documents, and day-to-day communication, a properly configured Notion portal is a rock-solid choice.
Do My Clients Have to Pay for Notion?
Nope! And this is a massive win. Your clients only need a free Personal Notion account to interact with everything in their portal—ticking off tasks, leaving comments, uploading files, you name it.
The sign-up is a one-time, two-minute process for them. While you could share a public, view-only page, that defeats the purpose of a collaborative portal. The free account is what unlocks the magic. Just be sure to include a quick "Hey, you'll need a free Notion account for this" instruction in your onboarding email.
The fact that clients don't need a paid subscription is a huge deal. It removes any friction or cost barrier for them, which dramatically boosts the chances they'll actually log in and use the portal you've built.
How Do I Keep Clients from Seeing Each Other's Information?
This is probably the most critical piece of the puzzle, and it all comes down to one simple, non-negotiable rule: you only share one top-level dashboard page per client. That's it. You never, ever share your master databases.
Your entire system is built on this principle. Each client's dashboard is just a window. It contains linked, filtered views of your master databases that are set to show only the projects, tasks, or documents tagged with their name.
This effectively creates a secure sandbox for every single client. They can't see your internal workspace, and they have zero visibility into anyone else's data. All your information lives together neatly on the backend, but each client only ever sees their tiny, specific slice of it.
What Happens If I Accidentally Delete a Client's Portal?
We've all had that heart-stopping moment of deleting the wrong thing. Thankfully, Notion has a great safety net built right in.
When you delete anything—a single to-do item or an entire client dashboard—it doesn't vanish forever. It just gets moved to your "Trash," which you can find in the left-hand sidebar.
Everything sits in the Trash until you permanently delete it. So, if you accidentally nuke a client's portal, you can just pop into the Trash, find the page, and restore it with one click. Everything will be put back exactly as it was.
For an extra layer of security (and total peace of mind), I also recommend getting into the habit of doing a full-workspace export from your settings every once in a while. It creates a complete backup you can store offline.
Ready to turn your Notion client portal into an automated communication powerhouse? With NotionSender, you can send and receive emails directly from your Notion databases, closing the loop between your projects and your clients. Start automating your client communication today at NotionSender.