
Build a Notion Project Management Template
A Notion project management template is way more than just a pre-filled page. Think of it as a complete, structured workspace designed to help your team plan, track, and actually finish projects without pulling their hair out. Instead of facing a blank canvas every time a new initiative kicks off, you start with a solid foundation of databases, properties, and views already set up to handle everything from a simple task list to a sprawling, multi-stage launch.
When done right, a good template brings all your tasks, deadlines, files, and conversations together in one central hub.
Why You Should Build Your Own Notion Template
You’ve probably seen the thousands of templates available online. While they look slick, grabbing a pre-made one often means forcing your team into someone else’s workflow. This almost always leads to friction. You end up with unused features, confusing properties, and a system that just never feels quite right.
Building your own Notion project management template changes the game completely. It's molded exactly to your team's unique processes, language, and goals. The real magic, though, is how a custom system can evolve. As your projects get more complex or your team’s needs shift, you can easily add new properties, tweak dashboards, or wire up new automations. You're never locked into a rigid structure that no longer works for you.
The Strategic Advantage of a Tailored System
When you build a system from the ground up, every single element has a purpose. There’s no clutter, no features that nobody understands—just a clean, efficient engine built for how your team actually operates. This approach pays off in a few key ways:
- Clarity is a given. Everyone on the team gets the system because they had a hand in building it. They're using terms and workflows they already know.
- Adoption happens naturally. People are far more likely to embrace a tool that genuinely solves their problems and makes their day-to-day work easier.
- It’s built to scale. The template can grow right alongside your company, easily handling new project types, more team members, and increasingly complex work without needing a total teardown.
A project management tool should cut down on administrative work, not create more of it. By building your own Notion template, you create a system that works for you, not the other way around.
Understanding the Core Components
This guide is going to walk you through, step-by-step, how to construct the essential building blocks for a powerful, custom-fit project management hub in Notion.
We're going to focus on building three interconnected databases. These aren't just separate lists; they're the backbone of your entire workflow, designed to work together to give you clarity at every level—from a 30,000-foot view of all projects down to the individual tasks someone is working on today.
Before we dive in, let’s get a high-level look at the databases we’ll be creating and how they’ll connect to form a cohesive system.
Core Components of Your Notion PM System
| Database Component | Primary Function | Key Benefit |
|---|---|---|
| Projects Database | The master list of all high-level initiatives. Tracks overall progress, timelines, and ownership. | Provides a single source of truth for all ongoing and planned projects, making it easy to see the big picture. |
| Tasks Database | Houses all the individual, actionable to-dos. Every task is linked directly to a parent project. | Breaks down large projects into manageable steps, ensuring nothing falls through the cracks. |
| Sprints Database | Organizes tasks into focused, time-boxed work cycles (e.g., weekly or bi-weekly). | Drives momentum and helps the team focus on a set of priorities within a specific timeframe. |
With these three databases working in concert, you'll have a robust framework for managing just about any project you can throw at it.
The growth in Notion's capabilities has been pretty wild to watch. The official template gallery now boasts over 7,344 templates, which is a staggering 250% increase from just a couple of years ago. This boom is fueled by the platform's incredible flexibility, which has helped contribute to a 68% jump in user satisfaction for project management. It's worth a look to see how others are leveraging Notion's power for inspiration.
Any great Notion project management system starts with a solid foundation. This isn't just about making a few lists; it's about building an interconnected hub where information flows smoothly from your biggest goals right down to your smallest daily to-dos. We're going to start by building the two most important databases from scratch: Projects and Tasks.
Think of these two as the central nervous system for your entire workspace. The Projects database is all about the "what" and "why," while the Tasks database handles the "how" and "when." By keeping them separate but cleverly linked, you get a level of clarity and control that’s just not possible otherwise.
This visual map shows how these core databases—Projects and Tasks—are the architectural backbone of the whole system, feeding information into all your dynamic dashboards.
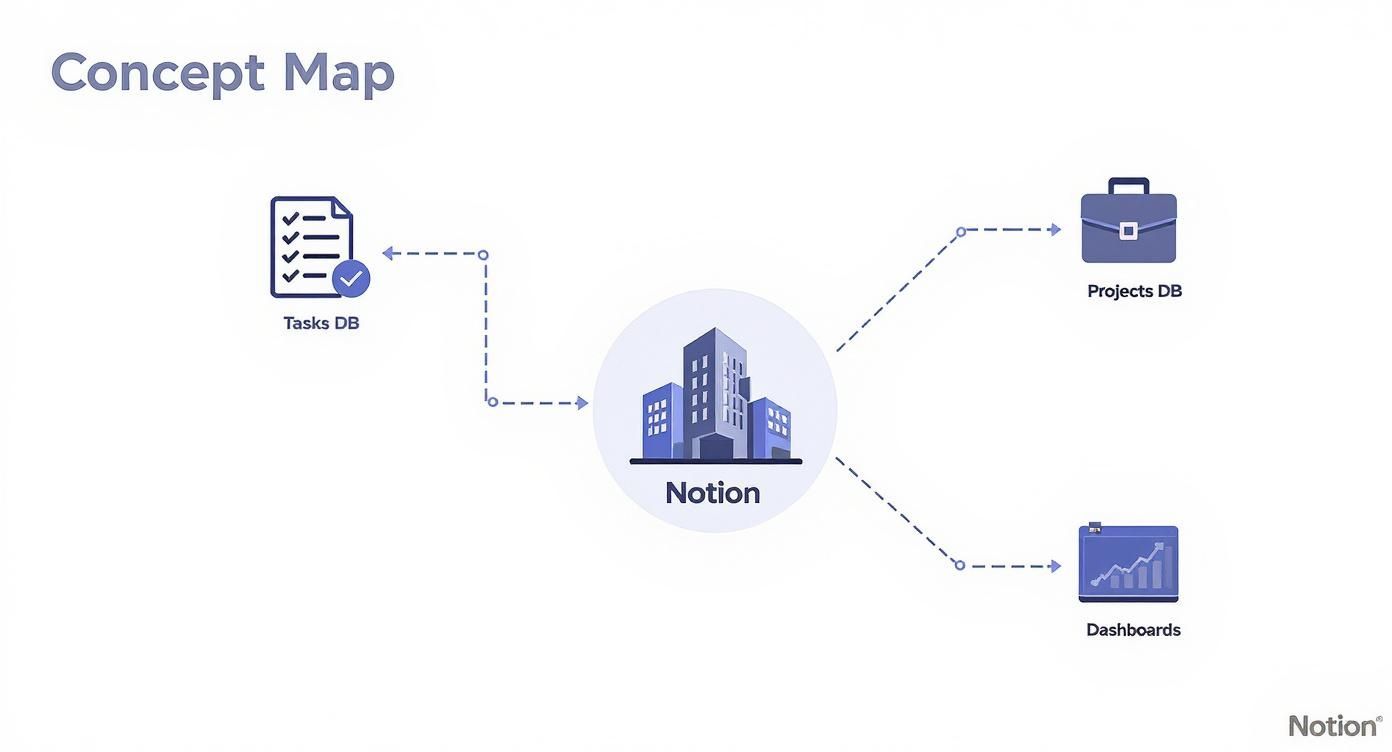 The real magic isn't in the lists themselves, but in the relational structure that turns them into a powerful, automated project management engine.
Creating the Projects Database
First up, let's get our 30,000-foot view in order. Create a new full-page database and name it "Projects." This is where you'll track every major initiative your team is working on. The goal here is to capture the high-level details, not get lost in the weeds.
Each entry in this database acts as a container for an entire scope of work. To make these containers actually useful, we need to add a few key properties.
Here are the essentials to start with:
- Status (Select): This tracks a project's current phase. Keep it simple with options like Planning, In Progress, and Completed. You can always add more complexity later, but starting simple is key.
- Timeline (Date): Use Notion’s date property and be sure to toggle on the "End date" option. This gives you a clear start and end for each project, which will be critical when we build out timeline views.
- Project Lead (Person): Every project needs a clear owner. Using the Person property makes it incredibly easy to filter dashboards and send notifications to the right person.
With just these properties, you’ve already built a high-level command center for your team's biggest priorities.
Crafting the Tasks Database
Next, create another full-page database and call it "Tasks." This is where the rubber meets the road. While the Projects database tracks the big picture, this one is all about execution—every single actionable item needed to push those projects forward.
The properties here need to be much more granular to help with day-to-day work.
Let's configure these core properties for your Tasks database:
- Due Date (Date): A single date property is perfect for setting clear deadlines. For effective time management, this is non-negotiable.
- Assignee (Person): Just like the Project Lead, this assigns responsibility for a specific task to a team member.
- Priority (Select): I find a simple three-tier system works best: High, Medium, and Low. Don't forget to color-code them for quick visual scanning on your boards.
- Status (Select): This is totally different from the project status. Use actionable steps like To Do, In Progress, and Done.
The key to a great task database is keeping it simple and actionable. Every single property should answer the questions: what needs to be done, who's doing it, and when is it due?
This focused approach pays off. A 2024 study showed that teams using custom Notion templates saw a 42% improvement in task completion rates. What's more, 78% of teams reported better collaboration, which they credited to the clarity of having centralized databases just like these.
The Magic of Relational Linking
Okay, now for the most important step—the one that turns these two separate lists into a genuine Notion project management template. We need to connect them.
Head over to your "Tasks" database. Add a new property and choose the Relation type. When Notion asks which database you want to connect to, select your "Projects" database. Name this new property "Project." Notion will then offer to create a corresponding relation back in the Projects database—definitely say yes to that.
This one connection changes everything.
Suddenly, every new task you create can be linked directly to its parent project from a simple dropdown menu. Every task now "belongs" to a project, creating a clean, organized hierarchy. This linkage is the secret sauce for building powerful dashboards, calculating project completion percentages automatically, and making sure every action is tied to a larger strategic goal. It also opens up the door for more complex integrations; you can learn more about how to leverage Notion's API for advanced workflows once you have this structure in place.
Designing Your Dynamic Dashboards
Okay, now that you've got your foundational databases in place, we can get to the fun part: crafting dynamic dashboards. This is where the magic really happens.
Think of your dashboards not as separate pages, but as specialized, filtered windows into your core Projects and Tasks databases. The whole point is to turn that raw data into something genuinely useful. Each dashboard should answer a specific question for different people on your team.
Your databases are the central library holding all project information. Your dashboards? They're the curated reading rooms. One is for the manager who needs a 30,000-foot view. Another is for the team to see the week's battle plan. And a crucial one is for the individual who just needs to know, "What do I need to get done today?"
This approach is powerful because it ensures everyone works from a single source of truth, which massively cuts down on confusion and crossed wires. Let's build out four essential dashboards that will turn your workspace from a simple data dump into an intelligent command center.
The Master Kanban Board
First up, the team's daily huddle spot: the Master Kanban Board. This is a non-negotiable view for your Tasks database. It gives everyone a real-time, visual snapshot of where every single task stands, showing momentum and flagging bottlenecks before they spiral into bigger problems.
To get this going, create a linked view of your "Tasks" database on a new page. You’ll want to select the "Board" layout and then configure it to group tasks by the Status property. Just like that, you'll have columns for "To Do," "In Progress," and "Done."
For extra clarity at a glance, I always customize the cards to show a few key properties:
- Assignee: See who's on the hook for what.
- Due Date: Keep those deadlines front and center.
- Priority: Help the team figure out what to tackle next.
Honestly, this single view is often the most-used part of any project management setup I build. The immediate visual feedback on workflow is just that valuable.
Visualizing Project Timelines
The Kanban board is brilliant for the day-to-day grind, but it doesn't really show you how projects overlap or if your timelines are even realistic. That’s a job for the Timeline view. Pulled from your "Projects" database, this high-level view is indispensable for project managers and leadership.
Create another new linked view, but this time, point it to your "Projects" database and pick the "Timeline" layout. Notion will automatically use the Timeline date property you created earlier to plot everything out on a visual calendar.
This view instantly clarifies dependencies and resource allocation. You can see if too many major projects are slated to finish in the same week or spot gaps in the schedule where new initiatives could slot in.
What I love is that you can just drag and drop the ends of each project bar to adjust timelines on the fly. It becomes a dynamic planning tool, not just a static chart. This kind of visual clarity is a huge help in preventing team burnout and ensuring work is balanced over time.
The Personalized "My Tasks" Dashboard
One of the biggest pitfalls of any shared project system is information overload. Your designer doesn't need to see every single engineering task, and vice-versa. They just need to see their tasks. This is where a personalized "My Tasks" dashboard comes in, creating a clean, focused to-do list for each person.
The secret here is a simple but incredibly powerful filter. Create one more linked view of the "Tasks" database (a List or Board layout both work well). The key is to add this specific filter:
Assignee → Is → Me
This little bit of magic dynamically shows only the tasks assigned to whoever is currently logged in and looking at the page. Suddenly, the noise is gone. Each team member gets a clutter-free view of their personal responsibilities, complete with due dates and priorities. This one feature does more for individual productivity and accountability than almost anything else.
Engineering a Project Health Overview
Finally, managers need a quick way to check the pulse of all projects without getting lost in the weeds of individual tasks. We can build a slick "Project Health Dashboard" by tapping into the power of the Relation and Rollup properties we already set up.
Head back to your main "Projects" database view. We're going to add a new property called something like "Task Completion."
- Choose the Rollup property type.
- For the Relation, select your "Tasks" database.
- For the Property to pull from, choose the "Status" property.
- And for the Calculate option, select Percent checked (or "Percent per group" and then choose "Complete").
This Rollup now automatically calculates the percentage of completed tasks for each project, displaying it as a tidy progress bar. It gives you an instant, data-driven overview of project health.
For those looking to take it a step further, you can explore the various ways to use Notion to send automated email updates when a project's status changes. With these dashboards in place, your Notion system is no longer just a template; it's a truly dynamic and responsive system tailored to every role on your team.
Even the most meticulously organized Notion project management template has an Achilles' heel: the gap between your pristine workspace and the chaos of your email inbox. This is the black hole where crucial requests, client feedback, and urgent action items get lost in the shuffle of manual copy-and-pasting.
Closing this gap is where you unlock some serious workflow efficiency. Instead of treating your inbox as a separate, competing to-do list, you can plug it directly into your Tasks database. This simple connection ensures every important communication becomes an actionable, trackable item inside your system—with zero friction.
Bridging Your Inbox and Notion
The goal here is simple: kill the manual data entry. This is where a tool like NotionSender comes into play. It acts as a dedicated bridge, giving your Notion databases unique email addresses. When you send or forward an email to one of these addresses, the content is intelligently parsed and saved as a brand-new entry.

Imagine a client pings you with an urgent change request for a design mockup. The old way? Open Notion, find the right project, create a new task, copy the client's name, paste the details... you get the idea. The new way? Just forward the email. A few seconds later, it appears as a perfectly formatted task, assigned and ready to go.
Setting Up Your Email-to-Task Workflow
Getting this automation up and running is surprisingly quick. First, you'll need to create a connection between NotionSender and your Notion account. Once you grant access, you can generate a unique email address specifically for your "Tasks" database. You can get your unique email integration set up in just a few minutes.
With your special email address in hand, the next step is mapping how email content translates into your Notion properties. It’s pretty intuitive:
- The Email Subject becomes the Task Name.
- The Email Body populates the page content (your task description).
- Any Attachments get saved right there within the task page.
You can also preset default properties to save even more time. For instance, any task coming from this email address can be automatically assigned a Status of "To Do" and a Priority of "Medium." This one-time setup saves dozens of clicks and keeps everything consistent.
The best automations are the ones you set up once and completely forget about. Integrating your email directly into your task database is one of those foundational tweaks that pays you back in saved time and mental energy every single day.
Practical Automation Examples
This goes way beyond just client requests. You could create different email addresses for different workflows, each with its own set of rules and default properties.
This table shows a common setup for turning client emails into actionable tasks.
NotionSender Email-to-Task Mapping Example
See how email components automatically map to properties in your Notion 'Tasks' database, streamlining your workflow.
| Email Component | Mapped Notion Property | Example Outcome |
|---|---|---|
| Email Subject | Task Name | "Revise Q3 Marketing Report" |
| Email Body | Page Content | The full client feedback becomes the task description. |
| Sender's Email | Text Property | "client@email.com" is saved for reference. |
| Default Setting | Status Property | Automatically set to "To Do". |
This kind of automation is a game-changer. As of 2025, there are over 88 competitive analysis templates in the Notion Marketplace, and the top versions are used by over 50,000 businesses. A 2024 survey of these users found that 72% reported a significant improvement in spotting market opportunities—a process often sparked by inbound emails and articles. Funneling that raw intel directly into a structured database is a huge part of their success.
If you're looking to really level up your Notion game, exploring essential marketing automation best practices can offer some great ideas. The core principles are the same: capture inputs, trigger actions, and maintain consistency. It's all directly applicable to managing projects and client communication right inside Notion.
Taking Your Template to the Next Level with Automation
A solid foundation is great, but the real magic happens when you start layering in smart automations and advanced properties. This is where your Notion project management template stops being a simple place to store information and becomes an active partner, handling the tedious stuff for you.
We're moving beyond basic data entry now. The goal is to build a system that anticipates what you need, calculates key metrics on the fly, and cuts out all those repetitive clicks. These are the details that make a template truly indispensable.
https://www.youtube.com/embed/R8IOW72zfMY
Creating Intelligent Template Buttons
One of the quickest wins for reducing manual work is Notion’s template buttons. Think about it: instead of building out the same set of sub-tasks every single time you launch a marketing campaign, you can pre-build the entire structure just once.
It's pretty straightforward. Inside your "Projects" database, just create a new database template. Let's call it "New Marketing Campaign." Inside the body of that template page, you can map out all your standard phases and checklists.
- Phase 1 Discovery: Add tasks like "Kickoff Meeting" and "Define KPIs."
- Phase 2 Content Creation: Drop in "Draft Ad Copy" and "Design Visuals."
- Phase 3 Launch: List out "Schedule Posts" and "Monitor Initial Engagement."
Now, anytime you spin up a new project and pick the "New Marketing Campaign" template, the page instantly populates with that whole structure. It’s a huge time-saver and keeps every project consistent right from the start.
Putting Native Notion Automations to Work
Notion’s built-in automations are perfect for simple, rule-based actions that don't require any outside tools. They're like little "if-this-then-that" recipes that keep your databases clean and current without you lifting a finger.
A classic, high-impact automation is automatically setting a "Completion Date." In your "Tasks" database, add a new date property and name it "Completed On." Then, hop into the automations tab and set up this simple rule:
Trigger: When Status is changed to Done. Action: Set Completed On to Today.
This small tweak is incredibly powerful. It helps you track your team's velocity and see how long tasks actually take compared to their deadlines. That's pure gold for planning future projects more accurately. If you're curious about the general benefits of workflow automation, this is a perfect example of saving time and making your data more reliable.
Unlocking Deeper Insights with Formulas and Rollups
Okay, this is where your template really becomes a data-driven command center. Advanced properties like Formulas and Rollups are what let you perform calculations and pull in related data, giving you insights that would otherwise be buried in a spreadsheet.
Here are a couple of my favorite, powerful examples to get you started:
- Calculate Project Duration: In your "Projects" database, add a Formula property. A simple formula like
dateBetween(end(prop("Timeline")), start(prop("Timeline")), "days")will instantly calculate the total number of days scheduled for every project. No more manual counting. - Display Overdue Tasks: This one is a game-changer. In the "Projects" database, create a Rollup property. Point it at your "Tasks" database, pull in the "Due Date" property, and use the "Count values" calculation. Then, you can add a filter to that rollup to only show tasks where the due date is before today. Just like that, you have an at-a-glance count of overdue items for each project, right on your main dashboard.
These aren't just fancy tricks to save a few clicks. They add a layer of intelligence that helps you make smarter decisions, spot problems before they blow up, and keep a clear, accurate picture of everything that's going on—all with minimal effort.
Got Questions? I've Got Answers
Whenever I'm helping teams build out a new workspace, a few questions always pop up. Let's tackle some of the most common ones right now so you can sidestep those little roadblocks and get the most out of your new project management hub.
Can This Notion Template Play Nice with Other Apps?
You bet it can. While I've focused on NotionSender for pulling emails into your workflow, Notion's API is the real powerhouse here. It opens up a world of possibilities for connecting with other tools.
With a little help from services like Zapier or Make.com, you can link your Notion setup to pretty much any app your team relies on.
Imagine setting up automations like these:
- A new task with a due date instantly syncs over to your Google Calendar.
- The moment a task's status flips to "Done," a notification pings the right channel in Slack.
- Project expenses tracked in Notion automatically update your books in a tool like QuickBooks.
The 'Projects' and 'Tasks' databases we've built are the perfect foundation for these kinds of integrations. It truly lets Notion become the central command center for everything you do.
How Do I Handle Team Permissions in This Setup?
This is a big one, especially as your team grows. Notion gives you really fine-grained control over who can see and do what, which is essential for keeping things organized and secure.
You can share the whole workspace with everyone, of course, assigning roles like 'Full Access' or 'Can Edit.' But the real magic is in page-level permissions. For a sensitive project, you can lock down the main project page so only the project lead and key stakeholders can touch it.
This means you can keep confidential information private and prevent anyone from accidentally messing with high-level project details.
A setup I see work really well is giving most team members 'Can Edit' access to the shared Tasks database, but restricting edit access on the main Projects database to just the project managers. It prevents any accidental changes to big-picture timelines or goals.
What's the Best Way to Manage Recurring Tasks?
Notion's built-in recurring tasks feature is your best friend here, and our template is set up to work with it perfectly. It's a non-negotiable for any routine work—think weekly reports, monthly client check-ins, you name it.
Just pop into your 'Tasks' database, and you can set any task to repeat on a custom schedule. A task like "Prepare Weekly Status Report" can be set to reappear every Friday morning. As soon as you mark one as 'Done,' Notion automatically creates the next one with the new due date. Simple, effective, and it ensures nothing ever gets missed.
Will This Template Work for Agile or Waterfall Teams?
Absolutely. That's the beauty of building your own Notion project management template—it's completely methodology-agnostic. You're not forced into a box. You can shape it to fit precisely how your team already operates, whether that's Agile, Waterfall, or something in between.
- For my Agile folks, the Kanban board view is a natural fit for sprint management. You could even add a 'Story Points' property or spin up a separate 'Sprints' database and link it to your tasks.
- If you're running Waterfall projects, the Timeline view is going to be your go-to for mapping out long-term phases and spotting dependencies.
The whole point is that you can add, remove, or tweak any property or view to make the template a perfect match for your team's unique project management style.
Ready to close the gap between your inbox and your project board for good? With NotionSender, you can forward any email straight into your task database, turning client requests and team feedback into actionable items in seconds. Get started for free and automate your workflow today.

